Thursday, November 19, 2015

3 Forms That Validate Input

Javascript is key to user interaction on webpages, and forms are perhaps the most ubiquitous way that users interact informationally with a webpage. However, the key to successful form implementation is to ensure that the proper information is submitted. This is called Form Validation. Below you will see 3 different examples of Form Validation throughout the web.

Craiglist

When posting on craigslist there are certain types of information required. As you can see below, when that information is not submitted, craigslist offers some very literal feedback to the user when the input is incorrect or incomplete. It seems this type of feedback could be achieved by using CSS to change the color, BOLDness, and border of a given object to emphasize its attention

http://bend.craigslist.org/(click the "post to classified" button)


Amazon
When joining Amazon you need to provide a minimum of information. However, as you can see below, while Chuck Norris can enter most of his information correctly, when he tries to enter his favorite password "RHK"(round house kick), Amazon rejects it because it is too short. Unlike the first example, Amazon's page only makes a dialog box appear stating that the information is incorrect instead of highlighting the fields.


Boston Globe
The Boston Globe's web developers are not very motivated. When you incorrectly fill in the below form on their website, the is barely any feedback. Instead of the two conspicuous examples we saw above, this form only appears a small, barely notable line of text that say that all the fields are necessary. This was likely done with a simple <span> and simple javascript. Shame on you lazy web developers!


Friday, November 13, 2015

A Quick Tutorial on Variables in Javascript.

No matter what your intent or purpose with Javascript, you will have to store, interpret, and manipulate data. JS makes this easy with various different types of ways to store your data. These types are Numbers, Strings, Booleans, Arrays, and Objects. Furthermore, these types are all encompassed under "Variables". Likewise, before initializing any of these data, the user will type "var" to classify it as a variable. Below I will briefly go over each data type to give you basic understanding of their structure and use.

Numbers
Numbers, as the name suggests, are, well....numbers. These can be used to store large numbers and small numbers, numbers with decimals, and even numbers in scientific notation. Please view below to see how these can be initialized and used. (Please note, the variable names do not need to describe the actual size or type of the variable, I just did this for ease of understanding.)

//A bunch of different number types!
var smallNumber  = 4;
var largeNumber  = 675894;
var decimalNumber = 3.14159
var scientificNotation = 546e5 // = 54,600,000

//Once you have initialized your variables, you can use them in math operations!

var newNumber = smallNumber + largeNumber; // = 675898

Strings
While numbers are used to store numeric data, Strings are used to store text data. Furthermore you can concatenate, AKA combine, strings with other strings and other data types to make larger strings. With strings it is critical that you use quotes around the text you want in the string, otherwise your code will do funky things or just not work at all


//Initialize your strings

var firstName = "Oliver";
var lastName = "Rew";
var status = "is awesome!";

//Concatenate your strings
var fundamentalTruth = firstName + " " + lastName + " " + status; //
//concatenates to: fundamentalTruth = "Oliver Rew is awesome!"
//Note the spaces within the quotes!

Arrays
So far, all the variables we have covered have been use to hold one value. However, as you code becomes more complex, you will want a more efficient and practical way to store many variables. For this we use arrays. Arrays are simply multiple variables within a variable, that can be access via their index. Arrays can store numbers, strings, and even other arrays within a single array. Furthermore, each item in an array has an index that corresponds to the variables consecutive order within the array.


/*You can either initialize an array with initial variables or you can initialize it empty and add the variables later. Please see both methods below*/

var oliversHobbies = ["Snowboarding", "Arduino", "Hiking"]

//or do the exact same thing

var oliversHobbies = [] //empty array
oliversHobbies[0] = "Snowboarding";
oliversHobbies[1] = "Arduino";
oliversHobbies[2] = "Hiking";

/*Please note in this last example that the first item in an array it index 0, the second is index 1, and so on.*/ 

Objects
Objects are very similar to arrays except for one fundamental difference; instead of using numbers to index the variables within an object, objects are indexed with properties.


//Please note that objects use curly braces{} instead of brackets[] like arrays
var oliversSuperlatives = {favoriteFood:"Burritos", favoriteSport:"Soccer", favoriteColor:"Green", numberOfFavorites:3};
//Use it!
dinnerTonight = oliversSuperlatives.favoriteFood //dinnerTonight would now equal "Burritos"


Booleans
Booleans are perhaps the simplest variable out there, they can only hold one of two values; True or False.

//Use booleans for variables that can be true or false
//Note, you do not need the quotes"" like strings
var oliverIsTerrific = true;
var oliverIsAlien = false;

Thursday, October 29, 2015

3 Online Resources Explaining and Demonstrating Use of Functions

The ability to compartmentalize code is vital to effective, efficient, and readable code. Functions allow us to do all this and much more; they are very easy use and hold great power. Below are 3 online resources that can enhance your knowledge and execution of functions.

1. Eloquent Javascript - Chapter 3
This chapter of Eloquent Javascript is very insightful in the function of, well, Functions.Eloquent Javascript takes the reader though all the basic operations and uses of functions. Furthermore, Eloquent Javascript is a very well designed web page more akin to an e-book than a tutorial page, it would look very good on a mobile browser.

http://eloquentjavascript.net/03_functions.html

2. Code Academy - Functions in Javascript
I am a big fan of Code Academy and its interactive web page style. It encompasses an info bar and an activity space. This way, you can read the theory and try it out on the same page. Furthermore, they offer a ton of useful exercises to hone your Javascript skills.

https://www.codecademy.com/courses/functions-in-javascript-2-0/0/1

3. Youtube user: thenewboston - Beginner Javascript Tutorial - 6- Functions
I can't get enough of thenewboston and his tutorial videos on Youtube. He has a simple and clear presentation that makes learning very easy and enjoyable. Likewise, this video about functions is very informative and gives the watcher a great understanding of functions in only 6 minutes!

https://www.youtube.com/watch?v=5nuqALOHN1M

Thursday, October 22, 2015

4 Examples of Form Elements to Use with Javascript

Forms are ubiquitous throughout the internet, any individual planning on creating web pages must be well versed in the applications of form inputs and elements. Here are a few that are very useful.

<select>

The <select> tag is used to create a drop-down menu with various options for the end user to choose from. This could be anything from which state they are in, to their profession, or maybe where they heard about the particular company who's webpage they are visiting. A list would be a great choice anytime a designer wished provide/limit the choices of the web page consumer.


<textarea>

The <textarea> tag is used to provide a large area in which the end user can input a large body of text. While small text boxes suffice for input like name or password, if a website designer wished for the end user to leave comments or special instructions, a textarea would definitely be the right choice. Additionally, these boxes can be configured to allow the end user to make the box larger to assist with larger amounts of text.

<input type="checkbox">

The checkbox input is another very useful tool for form design. If the designer wishes to limit an end user's choices but also give them the ability to choose more than one choice, the checkbox is the perfect tool. When implemented the browser inserts it's specific checkbox graphic and the end user can check and uncheck the option as he or she pleases. You can even make checkboxes automatically checked by default, or change the website layout upon check or uncheck and cause a new checkbox to appear or graying out an existing option.


<input type=file>

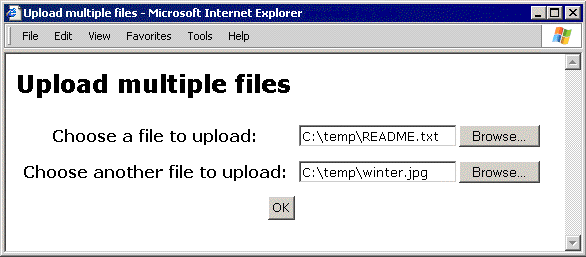
At times the web page designer may not just want the end users input in the browser, they may also wish for the end user to upload one of their own files that can then be used in a multitude of ways. A common implementation of this is in image sharing sites where a user would upload pictures or educational sites where the user would upload classwork.

Thursday, October 15, 2015

3 DOM Topics I'm Going to Master

It seems there are a million different ways the DOM allows HTML and Javascript to interact. Here are a few pretty cool properties and methods that could be used to add interesting interactivity and spontaneity to webpage.


1. Object.getOwnPropertyNames()

This method seems very useful because it interacts with many different elements and makes them accessible in an efficient and easily read format. When invoked, Object.getOwnPropertyNames() returns an array type variable of all properties associated with a given object. From there, it would be simple to parse this array into the sections that you are interested in and react based on what was returned. If you wanted to drastically change the appearance or content of a given object, Object.getOwnPropertyNames() would be a good option because it would provide all possible properties with one line of code and in one array. Check it out via the link below!

https://developer.mozilla.org/en-US/docs/Web/JavaScript/Reference/Global_Objects/Object/getOwnPropertyNames

2. Object.assign()

Often times there are multiple object elements on a page that share very similar or identical style attributes. Furthermore, in an interactive webpage it would be helpful to the viewer to assign similar object elements with similar attributes in order to convey relationships and paths. Object.assign() makes this task easy! Object.assign() take all properties of a given source and copies them to the target. This way, you can easily make one object element formatted exactly like another. Check it out in the link below!

http://www.2ality.com/2014/01/object-assign.html

3. document.forms.length

With forms being an integral part of user interaction on the internet, different and innovative ways to interact with forms enhances our ability to produce an attractive and coherent user experience. When document.forms.length is invoked, it returns the number of form elements in a collection. This operation could be very useful in validating the way in which a given user has used the form. Many forms have options, say a selectable list, that when selected adds another form box to the page for additional information. For example, if a form was asking for your occupation and had a long list of different occupations, at the bottom it might have an "other" option that when selected makes another form input element appear to enter your "other" occupation. If a form had multiple instances of this, it could be very helpful for the designer to use document.forms.length in order to know how many form elements are on a given page. With this information the designer could add functionality that interacts with the users unique input.


Thursday, October 8, 2015

Simple and Subtle Javascript Input Responses

When pondering this assignment, I figured the best place to look these little bite-size pieces of Javascript would be on websites that I am very familiar with and have regular interactions with.

1. Drop-down menus on Thingiverse.

Just about every website now-a-days has interactive drop down menus, but it wasn't until I started thinking about this assignment that I figured out Javascript was behind these minor aesthetic conveniences.

On the top of Thingiverse's home page there are 3 main menu options, "Dashboard", "Explore", and "Create". While "Dashboard" has no drop-down, "Explore" and "Create" both have whole drop-down submenus. Furthermore, I prefer these drop-down menus to other drop-down menus I have encountered because they only appear when you click on them and will stay activate until you click away. This is in contrast to other drop-down menus that will automatically open when you hover your cursor over them and will instantaneously disappear when your cursor (often mistakenly) leaves their bounding box.

http://www.thingiverse.com/


2. "Add note" feature for items on my eBay Watch list

I never noticed this feature before, but now that I know it's there I may just start using it. 

On my eBay watch list, when you hover your cursor over an item's picture, a small icon with text appears to the bottom right that allows you to "Add note" and save any notes/comments about the particular item. When you click on the icon, a small text box appears and when you are finished entering the text and press enter, a small note is automatically added under the item. At this point, the "Add note" button then appears as "Edit Note"


(You may need an eBay account to see your my eBay page)


3. Stylized underlining on Silodrome

They say it's the little things in life that matter most, I think this is a perfect example. 

As is common in seemingly all HTML, when you hover your cursor over a blue link, that link is automatically underlined. For the menu bar on Silodrome, the designers built off this aesthetic, but added their own flare with Javascript.  The menu bar options on Silodrome are just separated by a small vertical line and have a continuous underline floating below that is incorporated into the rest of the page. However, when you hover your cursor over one of these options, a thick red underline appears under the word and seemingly comes out of the smaller continuos underline. I really like this feature because it incorporates subtle user feedback into the aesthetic architecture of the page. Enjoy!


Thursday, October 1, 2015

My First Forays Into Coding

Computer programming is a fairly new hobby of mine. I have always been quite technically oriented, but it wasn't until February of 2015 that I really started to write code. At the time I had taken my motorcycle apart for the winter and I was trying to redo the auxiliary electrical system because it was currently a mess. After spending a bunch of time at Radioshack looking at relays and such, I spied something on the wall called an Arduino. I had heard of Arduino before, but always wrote it off because I thought the learning curve would be too steep. However, after explaining my current ideas for my electrical system to the friendly sales associate at Radioshack, he assured me that an Arduino would be perfect for my needs and that anyone could learn to use one. After much debate I decided I would give this little(and fairly cheap gizmo) a try. Fast forward two hours and I was already manipulating code on my computer.

The first Arduino Sketch (the Arduino term for a program) for most people is called "Blink". As the name suggests, the only thing this Sketch does is Blink an LED built into the Arduino board. To achieve this, the Sketch simply assigns a specific pin as an output, sets that pin high, delays for 1000 milliseconds, sets that pin low, delays for another 1000 milliseconds, and repeats. How simple! To natural tinkerers like myself, my first thought was to modify and rethink the program. In not too long I was changing the delay value, assigning multiple pins to multiple LEDs, and even adding buttons that control the LED behavior. I was hooked.

My present Arduino projects mainly involve automated machinery. My father owns a Fabrication Shop and he has many old machines to which he would like to add modern CNC (Computer Numeric Control) motion controllers. My current project is to use a PC, an Arduino board, servo motor drivers, and industrial servo motors in order to add very exact motion control to an industrial press brake, all controlled by a simple GUI that I am designing myself with Processing. This project mixes both "lite" Electrical Engineering with Arduino and Processing programming to make a fully functional and professional machine.

Beyond my industrial control projects, I am very interested to start experimenting with IoT(Internet of Things) projects. It is this pursuit that brings me to this class. If I am to understand how to connect physical objects to the internet, I had better know how to implement these connections into appealing web experiences.